Build intelligent customer support workflows that provide instant, personalized assistance using AI-powered automation. Transform your support operations with automated responses, analytics, and multi-channel integration.
Who Benefits from This Workflow?
Support Teams
Reduce repetitive tickets and identify common issues
Senior Managers
Evaluate team performance and customer satisfaction
Product & Sales
Analyze customer data and enhance processes
Marketing Teams
Better understand customer needs and behavior
Prerequisites
Access to a Delaverse account
Training files (FAQs, text documents, or data tables) ready for upload
Google account access for Google Docs and Google Sheets nodes
Telegram bot token for messaging node
Step 1: Create a New Project
Log in to Delaverse: Visit playground.delaverse.ai and sign into your Delaverse account
Select New Project:On the projects dashboard, click the New Project box
Name the Project: Enter a title, e.g., Customer Support, in the Project Name field and click Create Project
Enter the Playground:You'll be directed to the project's Playground, where you can add nodes
Step 2: Add Training Nodes
To train the AI Assistant, upload necessary data (e.g., FAQs, guides, or data tables) using the following nodes:
2.1. File Repository Node
Stores FAQs or predefined responses manually
1
From the right-hand menu, click File Repository Node to add it to the Playground
2
Click the node and enter a title, e.g., Support FAQs
3
In the Add New File section, click the button
4
Enter a file title, e.g., Customer FAQs
5
Click Add Question and Answer and input question-answer pairs
6
Example: Question: Why is my order delayed? Answer: Your order will arrive in 2 days.
7
After completing entries, click Add File
8
View added files with Active/Edit/Delete options
9
Click Save Changes and close with the top-left X button
2.2. Google Docs Node
Uploads text documents, such as service guides or company policies
1
From the right-hand menu, click Google Docs Node
2
Click the node and enter a title, e.g., Service Guide
3
In the Manage Google Docs section, click Connect to Google
4
Sign in with your Google account and grant Delaverse access (click Continue)
5
Click New Document, enter content (e.g., company policies) and rename the document
6
Return to the Playground and click Update to upload the document
7
Click Save Changes and close with the top-left X button
2.3. Google Sheets Node
Uploads structured data, such as question-answer tables or product information
1
From the right-hand menu, click Google Sheets Node
2
Click the node and enter a title, e.g., Product Data
3
Follow the same Google authentication steps as the Google Docs Node
4
Create a new sheet and enter data (e.g., pricing tables)
5
Return to the Playground and click Update
6
Click Save Changes and close with the top-left X button
2.4. File Database Node
Uploads files like PDFs, CSVs, or JSONs
1
From the right-hand menu, click File Database Node
2
Click the node and enter a title, e.g., Support Files
3
Upload files (e.g., PDF guides, JSON data)
4
Review the list of uploaded files
5
Click Save Changes
6
After closing, the number of uploaded files appears below the node title
Step 3: Connect Data to the Vector Database Node
To unify training data, connect the above nodes to a Vector Database Node:
Add Node: From the right-hand menu, click Vector Database Node
Configure Node:Click the node and enter a title, e.g., Support Database. Click Update
Connect Nodes: Click the + (output) icon on each previous node (File Repository, Google Docs, Google Sheets, File Database). Drag to the + (input) icon on the Vector Database Node
Verify Data: Click the Vector Database Node to ensure data from previous nodes is correctly aggregated
Save Changes: Click Save Changes and close the editor with the top-left X button
Step 4: Add the AI Assistant Node
This node generates automated responses to customer queries:
Add Node: From the right-hand menu, click AI Assistant Node
Configure Node:Click the node and enter a title, e.g., Support Assistant
Model Selection: Model Selection:
Instructions: Choose the Customer Support template or edit the instruction (see below)
Save Changes: Click Save Changes and close the editor with the top-left X button
AI Assistant Instruction Template
You are an AI assistant for customer support, responsible for generating accurate, professional, and relevant responses to customer inquiries.
Your goal is to combine training data from the following sources in the vector database with the customer’s question to provide an effective response that aligns with company policies:
    • Filebase with ID: ...(place ID)…
    • Google Docs with ID(s): ...(place ID)…
    • Google Sheets with ID: ...(place ID)…
    • File Repository with ID: ...(place ID)…
Your responsibilities include:
    • Analyze the customer’s question and identify their intent (e.g., inquiry, complaint, request).
    • Use the training data to generate a response.
    • If the question is unclear, generate a polite clarification question.
    • Write all responses in Persian, using a professional and friendly tone.
    • If sufficient information is not available, respond with:
"متأسفم، اطلاعات کافی برای پاسخ به این سؤال ندارم. لطفاً جزئیات بیشتری ارائه دهید یا با تیم پشتیبانی تماس بگیرید."
Step 5: Connect to the Telegram Node
To deliver responses via Telegram:
Create a Telegram Bot
in Telegram go to @BotFather and send /start
Send /newbot, choose a name (e.g., @SupportBot), and copy the bot token
Configure Telegram Node
Add Node: From the right-hand menu, click Telegram Node
• Click Register and Continue to confirm connectivity• Connect the AI Assistant Node's output to the Telegram Node's input• Test the bot by messaging it (e.g., /start) to ensure it's active
Step 6: Connect to the Frame Chat Node
This step enables delivering AI Assistant responses via an interactive chat frame on your website or app, with testing capabilities:
Basic Configuration
• Add Frame Chat Node from right-hand menu• Enter title, e.g., Support Frame• Set company name (e.g., Delaverse)
Domain Configuration
• Click the Domain tab• Enter domain where frame chat will be active• Example: delaverse.ai
Style Configuration
• Click the Style tab• Choose style (e.g., Colorful, Minimal)• Align with your brand
Implementation & Testing
• Connect AI Assistant Node's output to Frame Chat Node's input• Go to Code tab and click Copy Code to get HTML embed code• Use Test Frame option to preview and test responses• Embed code in your website's body to activate frame chat
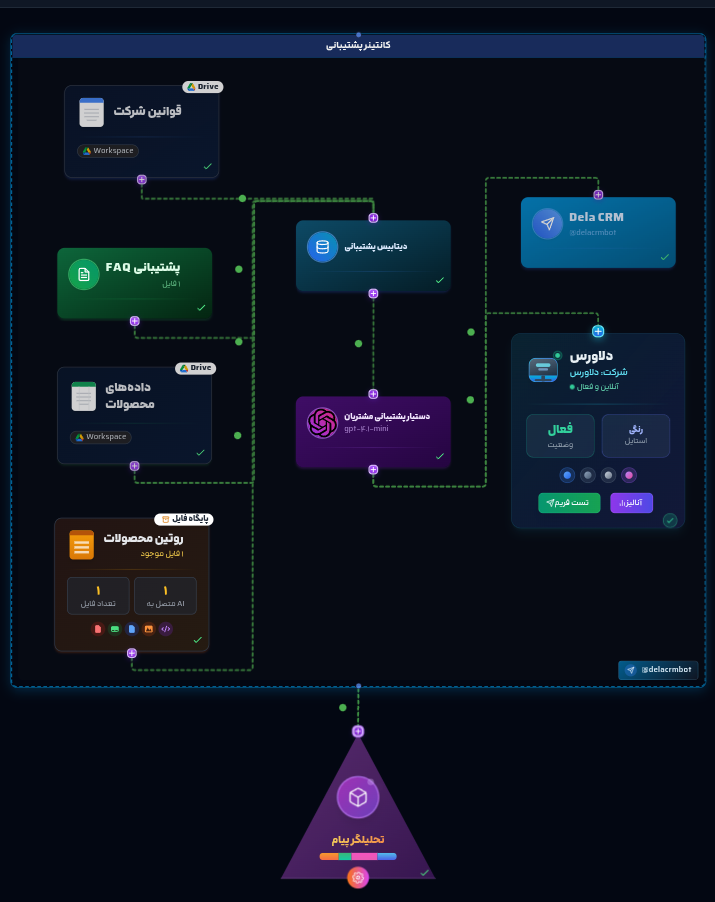
Step 7: Add the Container Node
To run the workflow in a unified environment and prepare for analysis:
Add Node: From the right-hand menu, click Container Node
Move Nodes:Drag and drop the File Repository, Google Docs, Google Sheets, File Database, Vector Database, AI Assistant, Telegram, and Frame Chat nodes into the Container Node
Confirmation:A green notification confirms successful addition
Verify Nodes:Click the Container Node to view the list of included nodes
Save Changes: Click Save Changes and close the editor with the top-left X button
Step 8: Add the Analyzer Node
To analyze support data and generate reports:
Add Node: From the right-hand menu, click Message Analyzer Node
Configure Node:Click the node and enter a title, e.g., Support Analyzer
Select an AI Model:Choose an AI model for analysis
Instructions: Choose the Customer Support Analyzer template or edit the instruction (see below)
Connect to Container:Connect the Container Node's output to the Message Analyzer Node's input
Message Analyzer Instruction Template
For User Messages:
You are an AI assistant tasked with analyzing customer conversations based on user messages.
Your goal is to provide accurate and professional reports to address managerial questions and improve support processes.
Required Actions and Analyses:
    • Question Types: Categorize questions (e.g., complaints, information requests, technical).
    • Customer Sentiment: Identify sentiment (positive, negative, neutral) where possible.
    • Conversation Metrics: Number of conversations and unique users.
    • Trends and Issues: Identify patterns or problems (e.g., increased complaints about product X).
    • Recommendations: Solutions for improvement (e.g., adding new FAQs or assistant training).
    • Deliver responses in Persian with a professional and friendly tone.
Frame Chat Analytics
To access analytics for interaction data:
Access Dashboard
Click the Frame Chat Node in the Playground
Go to the Code tab and copy the API key displayed below the HTML code
Click the Analyze button to open the dashboard page
Paste the API key into the API Key field on the dashboard
Click Enter Dashboard to access the analytics environment
Dashboard Tab
Message Count Chart: Displays messages exchanged, filterable by time (weekly, monthly, yearly)
Statistical Boxes: Total conversations, unique users, messages sent by users
Helps assess interaction volume and user engagement
Conver sation Analysis Tab
Click Analyze User Messages for advanced insights
Advanced sentiment analysis and pattern recognition
Query categorization and trending topics
Recent Conversations Tab
Lists all interactions between users and Frame Chat or Telegram bot
Update button to refresh with new conversations
Show More Messages button to load older interactions
Key Tips for Success
Continuous Saving: Always click Save Changes after configuring each node
Node Connections: Ensure nodes are connected correctly (output to input)
Test Telegram Bot: Verify bot functionality by messaging it after setup
Training Content: Use real, relevant data (e.g., company FAQs, product tables) for accurate AI responses
Final Output
Upon completing these steps, your workflow will:
Receive customer queries via Telegram
Generate automated, professional responses using training data
Analyze support data and produce reports, such as average response time or issue resolution rate
Provide 24/7 automated customer support across multiple channels
General Note on Workflow Customization This workflow, like all workflows in Delaverse’s knowledge base, is designed as a sample for educational purposes. Users can extensively customize nodes, settings, and input files to meet personal or organizational needs. For assistance, consult our 24/7 support chatbot or submit a ticket for guidance. If you’re unable to build or modify the workflow yourself, request professional workflow creation via a ticket; we’ll provide a cost invoice based on your subscription level, and after payment, we’ll collaborate to build it. For new node development (e.g., a custom node not yet available), submit a ticket with your requirements, noting that such requests may incur higher costs due to development efforts. Our team is here to ensure your automation success! 😊
Ready to Transform Your Customer Support?
Start building your intelligent customer support workflow today. With Delaverse's AI-powered nodes, you can automate responses, analyze performance, and provide exceptional customer service 24/7.