Build intelligent feedback collection workflows that gather insights from customers and employees, generate survey forms, and analyze satisfaction levels with AI-powered automation.
Target Audiences
HR Teams
Collect employee feedback and assess satisfaction levels
Marketing & Product Teams
Gather customer feedback and improve products/services
Senior Managers
Evaluate KPIs for customer and employee satisfaction
Development Teams
Integrate survey systems with existing tools
Prerequisites
Access to a Delaverse account
Relevant training files (e.g., survey forms, HR guides, or product information) ready for upload
Google account access for the Google Docs Node (if used)
Telegram bot token for the messaging node
Step 1: Create a New Project
Log in to Delaverse: Visit playground.delaverse.ai and sign into your Delaverse account
Select New Project: On the projects dashboard, click the New Project box
Name the Project:
Enter the Playground:You'll be directed to the project's Playground, where you can add nodes
Step 2: Add Training Nodes
To collect feedback, upload training data (e.g., survey forms or company information) using the following nodes:
2.1. Google Docs Node
Uploads text documents, such as HR guides or product/service information
1
From the right-hand menu, click Google Docs Node
2
Click the node and enter a title, e.g., Feedback Data
3
In the Manage Google Docs section, click Connect to Google
4
Sign in with your Google account and grant Delaverse access
5
Click New Document, enter content (e.g., survey forms or HR guides)
6
Set the document title and return to the Playground
7
Click Update to upload the document
8
Click Save Changes and close with the top-left X button
Suggested Content:
Customers: Survey forms with questions like Are you satisfied with product quality? or product details (e.g., features, pricing)
Employees: HR guides (e.g., company policies) or satisfaction survey forms (e.g., Are you satisfied with the work environment?)
2.2. File Database Node
Uploads related files, such as PDF survey forms or CSV feedback data
1
From the right-hand menu, click File Database Node
2
Click the node and enter a title, e.g., Feedback Files
3
Upload files (e.g., PDF survey forms, JSON data from past feedback)
4
Review the list of uploaded files
5
Click Save Changes and close with the top-left X button
Suggested Content:
Customers: PDF survey forms with standard questions (e.g., 1-5 ratings for services) or CSV files of prior feedback
Employees: PDF HR policies or JSON files with previous survey data
Note: Users can optionally add File Repository or Google Sheets nodes for additional data.
Step 3: Connect to the Vector Database Node
To unify training data:
Add Node: From the right-hand menu, click Vector Database Node
Configure Node: Click the node and enter a title, e.g., Feedback Database. Click Update
Connect Nodes:Connect the output of the Google Docs and File Database nodes to the input of the Vector Database Node
Verify Data: Click the Vector Database Node to ensure data is correctly aggregated
Save Changes: Click Save Changes and close the editor with the top-left X button
Step 4: Add the AI Assistant Node
This node collects customer and employee feedback and generates survey forms:
Add Node: From the right-hand menu, click AI Assistant Node
Configure Node: Click the node and enter a title, e.g., Feedback Database. Click Update|
Select AI Model: Select an AI model (e.g., Open AI)
Instructions: Choose the Customer Feedback Collection or Employee Feedback Collection template, or edit the instruction
Save Changes: Click Save Changes and close the editor with the top-left X button
Customer Feedback Instruction
You are an AI assistant named … for collecting customer feedback for … company. You have sufficient information about the company from:
- File Repository with ID(s): …
- Google Docs with ID(s): …
- Google Sheets with ID(s): …
- File Database with ID(s): …
in the Vector Database, and access to survey forms from:
- File Repository with ID(s): …
- Google Docs with ID(s): …
- Google Sheets with ID(s): …
- File Database with ID(s): …
in the Vector Database.

- If a customer provides feedback directly or via your survey form, store it and confirm receipt (e.g., Thank you for your feedback 😊).
- Write responses in Persian with a polite, friendly tone.
- If insufficient data is available, write: Sorry, please provide more details or contact our team.
Employee Feedback Instruction
You are an AI assistant named … for collecting employee feedback for … company. You have sufficient information about the company from:
- File Repository with ID(s): …
- Google Docs with ID(s): …
- Google Sheets with ID(s): …
- File Database with ID(s): …
in the Vector Database, and access to survey forms from:
- File Repository with ID(s): …
- Google Docs with ID(s): …
- Google Sheets with ID(s): …
- File Database with ID(s): …
in the Vector Database.

- If an employee provides feedback directly or via your survey form, store it and confirm receipt (e.g., Thank you for your feedback 😊).
- Write responses in Persian with a polite, friendly tone.
Form Generation Methods
Use Existing Files:
The AI Assistant sends pre-existing forms (e.g., PDFs in File Database, Google Docs)
Generate New Forms:
The AI Assistant creates new forms (e.g., multiple-choice questions) based on training data or user needs
Direct Instructions:
Users can input survey questions in the instruction (e.g., How satisfied are you with our services?)
Step 5: Connect to the Telegram Node
To collect feedback via Telegram:
Create a Telegram Bot
In Telegram, go to @BotFather, send /start, then /newbot
Choose a name, e.g., @FeedbackBot, and copy the bot token
Configure Telegram Node
Add Node: From the right-hand menu, click Telegram Node
Enter the bot token and click Test Connection
Configure Advanced Settings and access restrictions
Advanced Settings Configuration
• Welcome Message: Set a greeting message for users• Group Access: Enable for employee groups if needed• Access Restriction: Select All for customers; for employees, choose User List to restrict access• Message Limit: Set to, e.g., 10 messages per minute• Click Register and Continue to confirm connectivity
Final Steps
• Connect the AI Assistant Node's output to the Telegram Node's input• Click Save Changes and close the editor with the top-left X button• Test the bot by messaging it (e.g., /start) to ensure it's active
Step 6: Connect to the Frame Chat Node
This step enables delivering AI Assistant responses via an interactive chat frame on your website or app, with testing capabilities:
Basic Configuration
• Add Frame Chat Node from right-hand menu• Enter title, e.g., Feedback Frame• Set company name (e.g., Delaverse)
Domain Configuration
• Click the Domain tab• Enter domain where frame chat will be active• Example: delaverse.ai
Style Configuration
• lick the Style tab
• Choose style (e.g., Colorful, Minimal)
• Align with your brand• lick the Style tab
• Choose style (e.g., Colorful, Minimal)
• Align with your brand• lick the Style tab
• Choose style (e.g., Colorful, Minimal)
• Align with your brand
Implementation & Testing
• eturn to the Company Name tab and click Save Settings• Connect AI Assistant Node's output to Frame Chat Node's input• Go to Code tab and click Copy Code to get HTML embed code• Use Test Frame option to preview and test feedback collection• Embed code in your website's body to activate frame chat
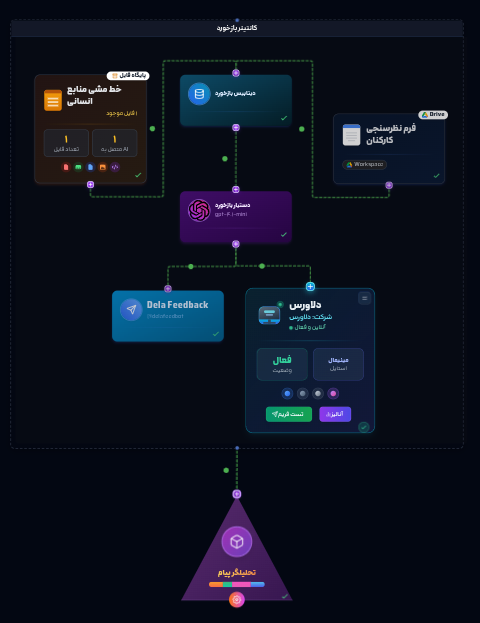
Step 7: Add the Container Node
To run the workflow in a unified environment:
Add Node: From the right-hand menu, click Container Node
Move Nodes: Drag and drop the Google Docs, File Database, Vector Database, AI Assistant, Frame Chat, and Telegram nodes into the Container Node
Confirmation:A green notification confirms successful addition
Verify Nodes: Click the Container Node to view the list of included nodes
Save Changes: Click Save Changes and close the editor with the top-left X button
Step 8: Add the Analyzer Node
To analyze feedback and assess satisfaction:
Add Node: From the right-hand menu, click Message Analyzer Node
Configure Node: Click the node and enter a title, e.g., Feedback Analyzer
Select AI Model: Select an AI model for analysis
Instructions: Choose the Customer Feedback Analysis or Employee Feedback Analysis template, or edit the instruction
Connect to Container: Connect the Container Node's output to the Message Analyzer Node's input
Feedback Analyzer Instruction Template
For User Messages:
You are an AI assistant tasked with analyzing employee feedback based on user messages.
Your goal is to analyze feedback to provide accurate and professional reports.
Required Actions and Analyses:
    • Response Rate: Percentage of users providing feedback.
    • Satisfaction Level: Sentiment analysis (positive, neutral, negative) based on keywords or ratings.
    • Feedback Types: Categorize feedback (e.g., complaints, suggestions, satisfaction).
    • Feedback Trends: Identify recurring themes (e.g., product or workplace issues).
    • Prioritization: Focus on specific metrics requested by managers (e.g., satisfaction in a specific period).
    • Deliver responses in Persian with a professional and friendly tone, using emojis (😊).
Frame Chat Analytics
To access analytics for interaction data:
Access Dashboard
Click the Frame Chat Node in the Playground
Go to the Code tab and copy the API key displayed below the HTML code
Click the Analyze button to open the dashboard page
Paste the API key into the API Key field on the dashboard
Click Enter Dashboard to access the analytics environment
Dashboard Tab
Message Count Chart: Displays messages exchanged, filterable by time (weekly, monthly, yearly)
Statistical Boxes: Total conversations, unique users, messages sent by users
Helps assess interaction volume and user engagement
Conversation Analysis Tab
Click Analyze User Messages for advanced insights
Advanced sentiment analysis and pattern recognition
Feedback categorization and trending topics
Recent Conversations Tab
Lists all interactions between users and Frame Chat or Telegram bot
Update button to refresh with new conversations
Show More Messages button to load older interactions
Save Changes: After reviewing the dashboard, return to the Playground and click Save Changes on the Frame Chat Node.
Key Tips for Success
Training Content: Use standard survey forms or real data (e.g., past feedback) for accuracy
Bot Access: Set All for customers; use User List for employees to enhance security
Testing: Test the Telegram bot by submitting feedback
Persian Language: Keep all settings and responses in Persian for Iranian users
Continuous Saving: Click Save Changes after every modification
Final Output
The Telegram bot collects feedback from customers and employees
Survey forms (pre-existing or generated) are sent to users
The analyzer processes feedback data, providing reports on satisfaction levels or recurring trends
Comprehensive analytics dashboard for tracking engagement and satisfaction metrics
Feedback Collection and Analysis This workflow, like all workflows in Delaverse’s knowledge base, is designed as a sample for educational purposes. Users can extensively customize nodes, settings, and input files to meet personal or organizational needs. For assistance, consult our 24/7 support chatbot or submit a ticket for guidance. If you’re unable to build or modify the workflow yourself, request professional workflow creation via a ticket; we’ll provide a cost invoice based on your subscription level, and after payment, we’ll collaborate to build it. For new node development (e.g., a custom node not yet available), submit a ticket with your requirements, noting that such requests may incur higher costs due to development efforts. Our team is here to ensure your automation success! 😊
Ready to Build Your Feedback Collection System?
Start building your intelligent feedback collection workflow today. Gather valuable insights from customers and employees, analyze satisfaction levels, and make data-driven decisions with AI-powered automation.