Delaverse AI Knowledge Base

Back to Home

Knowledge Base

Delaverse AI Platform v2.0

Lead and Customer Management

Build intelligent workflows to manage leads and customers using RFM (Recency, Frequency, Monetary) analysis and personalized SMS notifications. Automate lead scoring, customer segmentation, and targeted messaging to boost conversions and retention.

lead customer management workflow

Target Audiences

Sales and Marketing Teams

Analyze leads/customers and send targeted SMS follow-ups.

SMEs and Startups

Streamline CRM processes with cost-effective automation.

Enterprises

Scale lead management and customer engagement with robust integrations.

Developers

Integrate with CRM systems for advanced lead scoring and messaging.

Prerequisites

Access to a Delaverse account
KavehNegar API key for SMS Node configuration.
Google account for Google Sheets and Google Docs Nodes.
Customer data in a Google Sheet (columns: Name, Email, Phone Number, City, Last Purchase Date, Purchase Count, Total Spend, Average Spend, Interest Category).
RFM scoring guidelines in a Google Doc.
Telegram bot token for summary notifications.

Step 1: Create a New Project

Log in to Delaverse: (https://playground.delaverse.ai) and sign into your Delaverse account.
Select New Project: On the projects dashboard, click the New Project box.
Name the Project: Enter a title, e.g., “Lead and Customer Management,” in the Project Name field and click Create Project.
Enter the Playground: You’ll be directed to the project’s Playground, where you can add nodes.

Step 2: Add Content Input Nodes

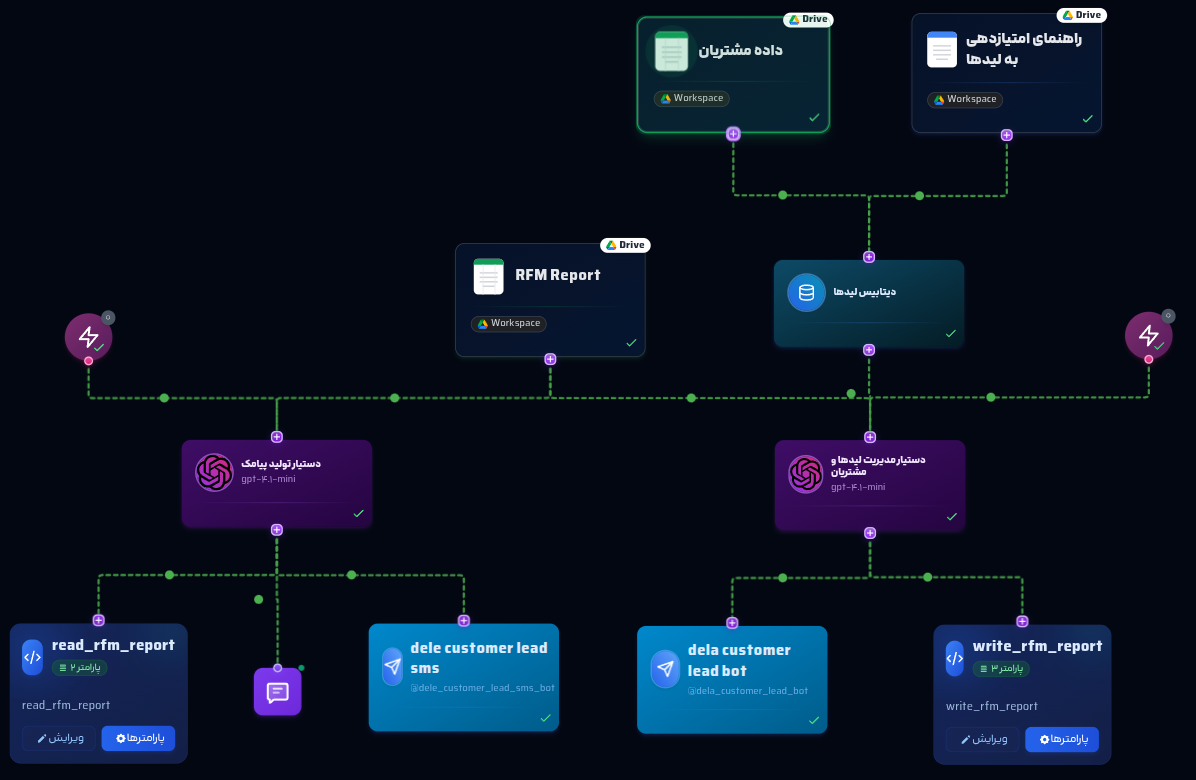
Input data comes from two sources: Google Sheets (customer data) and Google Docs (RFM scoring guidelines). Configure each node as follows.

2.1. Google Sheets Node

Uploads customer data for RFM analysis and messaging.

1
From the right-hand menu, click Google Sheets Node.
2
Click the node and enter a title, e.g., «داده‌های مشتریان» (Customer Data).
3
Sign in with your Google account and create a new sheet.
4
Enter data with columns: Name, Email, Phone Number, City, Last Purchase Date, Purchase Count, Total Spend, Average Spend, Interest Category.
5
Return to the Playground and click Update.

Suggested Content:

| Name | Email | Phone Number | City | Last Purchase | Purchase Count | Total Spend | Average Spend | Interest Category |
| Ali Rezaei | ali@example.com | 9197208607 | Tehran | 1404/03/01 | 5 | 5000000 | 1000000 | Electronics |
| Sara Ahmadi| sara@example.com | 9123456789 | Shiraz | 1404/01/15 | 1 | 200000 | 200000 | Fashion |

2.2. Google Docs Node

Uploads RFM scoring guidelines for lead/customer analysis.

1
From the right-hand menu, click Google Docs Node.
2
Click the node and enter a title, e.g., «راهنمای امتیازدهی RFM» (RFM Scoring Guide).
3
Sign in with your Google account and create a new document.
4
Enter RFM guidelines (e.g., scoring rules for Recency, Frequency, Monetary).
5
Return to the Playground and click Update.
6
Click Save Changes and close with the top-left X button.

Suggested Content:

Recency: Score 1–5 (1 = oldest purchase, 5 = recent).
Frequency: Score 1–5 (1 = 1 purchase, 5 = 5+ purchases).
Monetary: Score 1–5 (1 = low spend, 5 = high spend).
Combine scores for categories (e.g., VIP: RFM ≥ 12, Potential: RFM 6–9).

Step 3: Connect Data to Vector Store Node

To unify customer data and RFM guidelines:

Add Node: From the right-hand menu, click Vector Store Node.
Configure Node:Click the node and enter a title, e.g., «دیتابیس RFM» (RFM Database). Click Update.
Connect Nodes:Connect the outputs of the Google Docs Node and Google Sheets Node to the input of the Vector Store Node.
Verify Data:Click the Vector Store Node to ensure data is correctly aggregated.
Save Changes:Click Save Changes and close with the top-left X button.
Important Note:The Vector Store Node stores data statically. To update data: - Delete the associated file in the Vector Store.- Disconnect the Google Docs or Google Sheets Node.- Update the source data.- Reconnect the nodes to reload updated data.

Step 4: Add the AI Assistant Node (RFM Analysis)

This node analyzes customers using the RFM model and generates a report.

Add Node: From the right-hand menu, click AI Assistant Node.
Configure Node:Click the node and enter a title, e.g., «تحلیل RFM» (RFM Analysis).
Select AI Model:Choose an AI model (e.g., Open AI).
Instructions:Use the RFM Analysis template below.
Connect Nodes:Connect the Vector Store Node output to the AI Assistant Node’s input.
Save Changes:Click Save Changes and close with the top-left X button.

RFM Analysis Instruction Template

You are an AI assistant for lead and customer management. Your goal is to analyze customer data using the RFM (Recency, Frequency, Monetary) model and classify leads for prioritization.

1. Retrieve data:
   - Customer data from Google Sheet (…Google Sheet ID…): Name, Email, Phone Number, City, Last Purchase Date, Purchase Count, Total Spend, Average Spend, Interest Category.
   - RFM scoring guidelines from Google Doc (…Google Doc ID…) in the Vector Store.

2. Implement RFM model per the guidelines:
   - Recency: Score 1–5 based on Last Purchase Date.
   - Frequency: Score 1–5 based on Purchase Count.
   - Monetary: Score 1–5 based on Total Spend.
   - Calculate RFM Score (sum of R, F, M) and assign categories (e.g., VIP: RFM ≥ 12, Potential: 6–9, Needs Attention: <6, Loyal: high Frequency).

3. For all customers, call the updateCustomerRFM function with this structure:
   updateCustomerRFM(
     "sheet_id": "…google sheet ID…",
     "data": [
       {
         "customer": "Name",
         "email": "Email",
         "rfm_score": "RFM Score",
         "category": "Category",
         "phone": "Phone Number"
       }
     ]
   )
  

4. Important:
   - Provide no descriptions or analysis, only call updateCustomerRFM.
   - Announce the result of the function call (e.g., “Report written successfully”).

Step 5: Add Google Sheets and Function Call Nodes (RFM Report)

To store the RFM report and execute the write function:

5.1. Google Sheets Node (RFM Report)

From the right-hand menu, click Google Sheets Node
Click the node and enter a title, e.g., «گزارش RFM» (RFM Report).
Sign in with your Google account and create a new sheet.
Click Update and Save Changes, then close with the top-left X button.

5.2. Function Call Node (Write RFM Report)

1. From the right-hand menu, click Function Call Node.
2. Click the node, enter a title, e.g., «نوشتن گزارش RFM» (Write RFM Report), and press Parameters.
3. Select node, add title, click Parameters.
4. Non-technical: Use Write to Google Sheets template for auto-config. Set JSON name to match function name.
5. Copy Google Doc ID from Google Docs Node, paste into your_sheet_id in JSON.
6. Copy “Provide rows as a 2D array. First row should be headers ['Customer', 'Phone', 'Email', 'RFM Score', 'Category'], followed by data rows.” And paste in front of “description” under the “data” part of the JSON.
7. Technical: Use Build with AI, write Persian instructions, click Build Smart Parameters.4. Connect the AI Assistant Node (RFM Analysis) output to the Function Call Node input.
8. Connect the Function Call Node output to the Google Sheets Node input.
9. Click Save Changes and close with the top-left X button.
Support Note: For complex Function Call setups, consult your technical team or submit a ticket for professional assistance.

Step 6: Add the First Telegram Node (RFM Summary)

This step enables delivering AI Assistant responses via an interactive chat frame on your website or app, with testing capabilities:

1. Create a Telegram Bot:

• Go to @BotFather, send /start, then /newbot, name it (e.g., @RFMBot), and copy the token.

2. Configure Telegram Node:

- From the right-hand menu, click Telegram Node. - Enter a title, e.g., «خلاصه RFM» (RFM Summary). - Enter the bot token and click Test Connection. - Configure Advanced Settings: - Welcome Message: «سلام! آماده دریافت خلاصه تحلیل RFM هستید؟ 😊» - Group Access: Enable if needed. - Access Restriction: Select All. - Message Limit: Set to 10 messages per minute. - Click Register and Continue.

Connect Nodes:

Connect the AI Assistant Node (RFM Analysis) output to the Telegram Node input for summaries (e.g., “50 customers analyzed, 10 VIPs identified”).

4. Test the Bot:

Message /start to verify summaries.

5. Save Changes:

Click Save Changes and close with the top-left X button.

Step 7: Add the Trigger Node

To automate the workflow execution:
1. Add Node:From the right-hand menu, click Trigger Node.
2. Configure Node: - Enter a title, e.g., «تریگر مدیریت مشتریان» (Customer Management Trigger). - Timing Settings: Choose Interval (e.g., 1 day) or Cron Expression (e.g., “0 9 ” for 9 AM), set timezone to Asia/Tehran. - Message Text: Enter «مطابق دستورالعمل، عمل کن» (Act per instructions). - Maximum Executions: Leave blank or set a limit (e.g., 10). - Trigger Status: Toggle to On.
3. Connect Nodes:Connect the Trigger Node output to the AI Assistant Node (RFM Analysis) input.
4. Test the Trigger: Click Test Trigger to simulate and verify outputs.
5. Save Changes:Click Save Changes and close with the top-left X button.

Step 8: Add the Second AI Assistant Node (SMS Generation)

This node generates personalized SMS messages based on RFM categories.
1. Add Node:From the right-hand menu, click AI Assistant Node.
2. Configure Node:Click the node and enter a title, e.g., «تولید پیامک» (SMS Generator).
3. Select AI Model: Choose an AI model (e.g., Open AI).
4. Instructions: Use the SMS Generation template below.
5. Connect Nodes:- Connect the Google Sheets Node (RFM Report) output to the AI Assistant Node’s input via a Function Call Node (Step 9).
6. Save Changes: Click Save Changes and close with the top-left X button.

SMS Generation Instruction Template

You are an AI assistant for generating personalized SMS messages. Your goal is to create marketing SMS messages based on RFM customer data for goals like retention, repeat purchase, or new product promotion.
1. Retrieve customer data by calling the …read function’s name… function to extract columns: customer, email, rfm_score, category, phone from Google Sheet.
2. For each customer, generate an SMS based on their category:
   - VIP: Encourage repeat purchase (e.g., «علی عزیز، با خرید دوباره ۱۰٪ تخفیف بگیرید! 😊»).
   - Potential: Promote first purchase (e.g., «سارا جان، محصول جدید ما رو امتحان کن! 🎉»).
   - Needs Attention: Re-engage (e.g., «محمد عزیز، دلمون براتون تنگ شده! با کد XYZ ۲۰٪ تخفیف بگیرید.»).
   - Loyal: Reward loyalty (e.g., «مهران عزیز، ممنون که همراهمون هستی! 😊»).
3. Ensure messages are:
   - In Persian, friendly tone, under 160 characters, with up to 2 emojis.
   - Tailored to the customer’s category.
4. Generate a JSON output for each customer:

   {
     "receptor": "Phone Number",
     "message": "message"
   }
  
5. Combine all outputs into a JSON list:
  
   [
     {
       "receptor": "09197208607",
       "message": "علی عزیز، با خرید دوباره ۱۰٪ تخفیف بگیرید! 😊"
     },
     {
       "receptor": "09123456789",
       "message": "سارا جان، محصول جدید ما رو امتحان کن! 🎉"
     }
   ]
  
6. Send the JSON list to the SMS Node for delivery.
7. Send a summary to the Telegram Node (e.g., “20 SMS messages sent to VIP customers”).
Important:
- Output must be JSON only, with no descriptions or analysis.
- Messages must be in Persian, under 160 characters.
- Send the summary to Telegram in Persian.

Step 9: Add Function Call Node (Read RFM Report)

To read the RFM report from Google Sheets:

1. Add Node:

From the right-hand menu, click Function Call Node.

2. Configure Node:

Click the node, enter a title, e.g., «خواندن گزارش RFM» (Read RFM Report), and press Parameters.
3. Select the “Read from Sheets” template and paste the Google Sheet ID.4. Connect the Google Sheets Node (RFM Report) output to the Function Call Node input.5. Connect the Function Call Node output to the AI Assistant Node (SMS Generation) input.6. Click Save Changes and close with the top-left X button.

Step 10: Add the SMS Node

To send personalized SMS messages via KavehNegar:
1. Add Node:From the right-hand menu, click SMS Node.
2. Configure Node: Click the node and enter a title, e.g., «ارسال پیامک مشتریان» (Customer SMS).
3. API Configuration:- Enter your KavehNegar API key.
4. Message Type Selection:
- Choose Templated Message.
- Enter template title in English (e.g., “CustomerFollowUp”).
- Specify tokens: Token 1 (Customer), Token 2 (Offer or Status).
- Select message type: SMS.
- For testing: Enter a test number (e.g., +989123456789) and test message (e.g., «سلام! این پیام آزمایشی است.»).
- Click Send Test SMS to verify delivery.
5. Connect Nodes: Connect the AI Assistant Node (SMS Generation) output to the SMS Node input for JSON message data.
6. Save Changes: Click Save Changes and close with the top-left X button.
Support Note:
For high-volume SMS campaigns, monitor KavehNegar’s dashboard or submit a ticket for assistance.

Step 11: Add the Second Telegram Node (SMS Summary)

To deliver SMS campaign summaries:
1. Create a Telegram Bot:Use @BotFather, create a bot (e.g., @SMSCustomerBot), and copy the token.
2. Configure Telegram Node:
- From the right-hand menu, click Telegram Node.
- Enter a title, e.g., «خلاصه پیامک» (SMS Summary).
- Enter the bot token and click Test Connection.
- Configure Advanced Settings:
- Welcome Message: «سلام! آماده دریافت خلاصه پیامک‌های ارسالی هستید؟ 😊»
- Group Access: Enable if needed.
- Access Restriction: Select All.
- Message Limit: Set to 10 messages per minute.
- Click Register and Continue.
3. Connect Nodes:Connect the AI Assistant Node (SMS Generation) output to the Telegram Node input for summaries (e.g., “20 SMS sent to VIP customers”).
4. Test the Bot:Message /start to verify summaries.
5. Save Changes:Click Save Changes and close with the top-left X button.

Step 12: Add the Trigger Node

To automate the initiation of your workflow with precise timing:

Add Node:

From the right-hand menu, click Trigger Node and drag it onto the canvas in the Delaverse Playground.

2. Configure Node:

Click the node and enter a title.Timing Settings: In the “Timing Settings” section, choose the scheduling type from the dropdown: - Interval: Select a value and unit (e.g., 1 day) for regular execution, and set the timezone (e.g., Asia/Tehran).- Cron Expression: Enter a Cron pattern, e.g., “0 8 * * *” for daily at 8 AM, following the provided example.Message Text: Enter “مطابق دستورالعمل، عمل کن” (Act per instructions) to guide the AI Assistant Node in executing the workflow’s analysis and reporting tasks.Maximum Executions: Leave blank for unlimited runs or enter a number (e.g., 10) to cap executions.Trigger Status: Toggle the status button to “On” to activate the trigger.Status Info: After setup, review execution history (e.g., runs completed) and click “Update Schedule” if timing changes are needed.

Connect Nodes:

• Connect the Trigger Node’s output to the AI Assistant Node’s input to initiate the workflow.

Test the Trigger

• Configure timing and message text, then click “Test Trigger” to simulate a workflow run. Verify outputs appear in Telegram, Google Sheets, or Google Docs, depending on your setup.

Save Changes:

• Click “Save Changes” to apply all configurations, then close the editor with the top-left “X” button to return to the Playground.

Why It’s Needed

• The Trigger Node automates the start of non-API workflows, working with the AI Assistant Node to initiate the workflow.

Key Tips for Success

Data Accuracy: Ensure Google Sheets contains valid phone numbers (e.g., 9197208607) and RFM-relevant data (e.g., Last Purchase Date, Total Spend).
RFM Guidelines: Verify the Google Doc clearly defines scoring rules for accurate categorization.
Message Length: Keep SMS messages under 160 characters for KavehNegar compatibility.
Test SMS: Use the SMS Node’s Send Test SMS feature to confirm delivery before scaling.
Save Regularly: Click Save Changes after every modification to avoid data loss.
Monitor KavehNegar: Check delivery logs in KavehNegar’s dashboard for high-volume campaigns.

Final Output

- Customer data and RFM guidelines are unified in the Vector Store.
- Customers are analyzed using the RFM model, with results stored in a Google Sheet (columns: Customer, Email, RFM Score, Category, Phone).
- Personalized SMS messages are generated based on RFM categories (VIP, Potential, Needs Attention, Loyal) and sent via KavehNegar.
- Summaries of RFM analysis and SMS campaigns are sent via Telegram (two bots).
- A final workflow summary is delivered via Telegram.
- An automated system for lead/customer management and targeted messaging is established.

Ready to Transform Your Lead and Customer Management?

Start building your Lead and Customer Management workflow today. Automate RFM analysis, prioritize leads, and engage customers with personalized SMS messages to drive conversions and retention with AI-powered precision.