Delaverse AI Knowledge Base

Back to Home

Knowledge Base

Delaverse AI Platform v2.0

SMS Marketing Automation

Build intelligent SMS and email marketing workflows that collect customer data, generate personalized messages based on brand tone and marketing goals, and prepare them for delivery with AI-powered automation.

sms marketing workflow

Target Audiences

Marketing Teams

Send personalized SMS and emails, boosting engagement

Sales Teams

Improve conversion rates and target leads effectively

Senior Managers

Evaluate marketing campaign performance and ROI

Development Teams

Integrate with CRM or marketing tools seamlessly

Prerequisites

Access to a Delaverse account
Customer data (e.g., name, phone number, email, purchase history) ready for upload
Google account access for Google Sheets and Google Docs Nodes
API access to CRM systems (if used) with authentication details

Step 1: Create a New Project

Log in to Delaverse: Visit playground.delaverse.ai and sign into your Delaverse account
Visit playground.delaverse.ai and sign into your Delaverse account On the projects dashboard, click the New Project box. Enter a title, e.g., SMS Marketing Automation, in the Project Name field and click Create Project Enter the Playground: You'll be directed to the project's Playground, where you can add nodesSelect New Project: On the projects dashboard, click the New Project box.
Select New Project: Enter a title, e.g., SMS Marketing Automation, in the Project Name field and click Create Project
Name the Project: Enter the Playground: You'll be directed to the project's Playground, where you can add nodes

Step 2: Add Training Nodes

To generate personalized SMS messages, upload customer data and marketing guidelines using the following nodes:

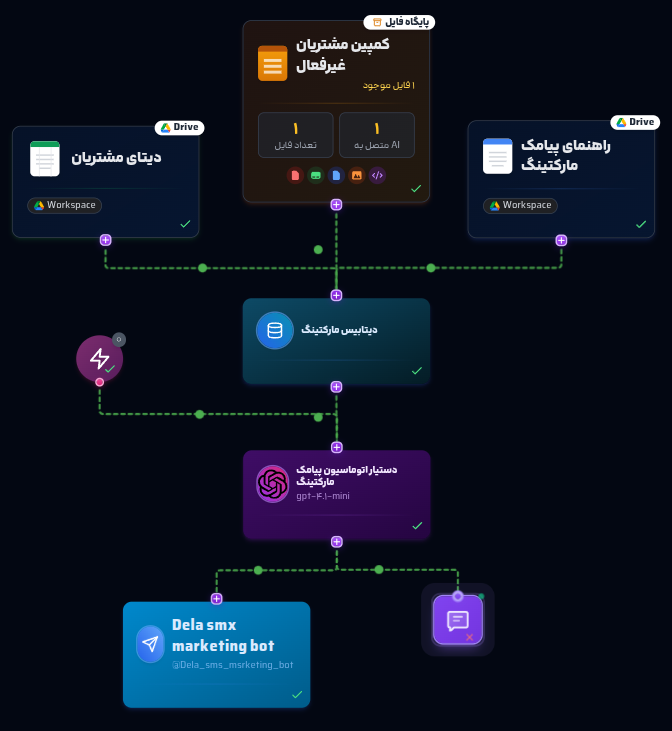
2.1. File Database Node

Uploads customer data files

1
Add Node: From the right-hand menu, click File Database Node
2
Configure Node: Click the node and enter a title, e.g., داده‌های مشتریان (Customer Data)
3
Upload files (e.g., CSV customer lists, JSON interaction data, or PDF campaign specs)
4
Review the list of uploaded files
5
Save Changes: Click Save Changes and close the editor with the top-left X button

Suggested Content:

CSV files with columns: name, phone number, email, last purchase date, customer category
JSON files with behavioral data (e.g., clicks or visits)
PDF campaign specifications (e.g., special discounts)

2.2. Google Docs Node

Uploads brand tone guidelines and marketing instructions

1
Add Node: From the right-hand menu, click Google Docs Node
2
Configure Node: Click the node and enter a title, e.g., راهنمای مارکتینگ (Marketing Guide)
3
Sign in with your Google account and grant Delaverse access
4
Create a new document, enter content (e.g., brand tone or SMS guidelines), and set the title
5
Return to the Playground and click Update
6
Save Changes: Click Save Changes and close the editor with the top-left X button

Suggested Content:

Brand tone guide (e.g., Friendly and respectful tone with 😊 emoji)
Campaign instructions (e.g., Promotion SMS: 20% discount for purchases over 1 million IRR or Retention SMS: Invite return with discount code)

2.3. Google Sheets Node

Uploads tabular customer data

1
Add Node: From the right-hand menu, click Google Sheets Node
2
Configure Node: Click the node and enter a title, e.g., دیتابیس مشتریان (Customer Database)
3
Sign in with your Google account, create a new sheet, or select an existing one
4
Enter data (e.g., name, phone number, email, purchase date)
5
Click Update
6
Save Changes: Click Save Changes and close the editor with the top-left X button

Suggested Content:

Tables with columns: name, phone number, email, customer category (e.g., loyal, new), last purchase date

2.4. API and Request API Nodes (Optional)

Retrieve customer data from CRM or external systems

Add API Node:
From the right-hand menu, click API Node
Click the node and enter a title, e.g., API مشتریان (Customers API)
Enter the base URL (e.g., https://crm.example.com/api)
Configure Authentication: No Authentication, Basic Auth, Bearer Token, or API Key
If headers or query parameters are needed, click Add Header, enter name and value
Click Save Changes and close the editor with the top-left X button
Add Request API Node:
From the right-hand menu, click Request API Node
Click the node and enter a title, e.g., درخواست داده‌های مشتریان (Customer Data Request)
In the Used API section, select the previous API Node
Choose the request type (e.g., GET) and enter the endpoint (e.g., /customers)
Configure tabs: Request, Headers, Parameters, Body, Response
Click Execute Request to view results
Connect the API Node's output to the Request API Node's input

Suggested Content:

Customer data like name, phone number, email, and purchase history

Step 3: Connect to the Vector Database Node

To unify data (excluding Request API):

To unify data (excluding Request API): From the right-hand menu, click AI Assistant Node
Configure Node: Click the node and enter a title, e.g., دیتابیس مارکتینگ (Marketing Database). Click Update
Connect Nodes: Connect the outputs of the File Database, Google Docs, and Google Sheets Nodes to the input of the Vector Database Node
Verify Data: Click the node to ensure data is correctly aggregated
Save Changes: Click Save Changes and close the editor with the top-left X button
Note: The Request API Node does not connect to the Vector Database Node; connect it directly to the AI Assistant Node.

Step 4: Add the AI Assistant Node

This node generates personalized SMS and email messages:

Add Node:From the right-hand menu, click AI Assistant Node
Configure Node: Click the node and enter a title, e.g., تولید پیامک (SMS Generator)
Select AI Model: Select an AI model (e.g., Open AI)
Instructions: Choose the Personalized SMS Generator template or edit the instruction (see below)
Configure Node: Connect the outputs of the Vector Database Node and Request API Node to the AI Assistant Node's input
Save Changes: Click Save Changes and close the editor with the top-left X button

Personalized SMS Generator Instruction Template

You are an AI assistant for SMS and email marketing automation. Your goal is to generate personalized SMS and email messages based on customer data and brand tone guidelines for marketing objectives (e.g., promotions, retention, or new product launches).

- Retrieve customer data (name, phone number, email, category) from:
  - Google Docs with ID(s): …
  - File Database with ID(s): …
  - Google Sheets with ID(s): …
  in the Vector Database
  - or Request API Node.

- Adhere to brand tone and marketing guidelines (from Google Docs).

- Write SMS messages short (under 160 characters), in Persian, with a friendly tone.

- Possible objectives:
  - **Promotion**: Discounts or special offers (e.g., "علی عزیز، ۲۰٪ تخفیف تا پایان هفته! 😊").
  - **Retention**: Invite return (e.g., "سارا جان، دلمون برات تنگ شده! کد XYZ رو امتحان کن.").
  - **New Product**: Introduce products (e.g., "محمد عزیز، محصول جدید ما رو ببینید! 🎉").

- Produce output as structured JSON, including: customer name, phone number, SMS text.

Example output:
{
  "customer": "علی محمدی",
  "phone": "09123456789",
  "sms": "علی عزیز، ۲۰٪ تخفیف تا پایان هفته! 😊"
}

Step 5: Connect to the SMS Node

To send generated SMS and email messages:

Connect Nodes: Connect the AI Assistant Node's output to the input of the SMS Node
Save Changes: Click Save Changes and close the editor with the top-left X button
Note: The Request API Node does not connect to the Vector Database Node; connect it directly to the AI Assistant Node.

Step 6: Connect to the Telegram Node

To deliver analyses via Telegram:

Create a Telegram Bot:

In Telegram, go to @BotFather, send /start, then /newbotChoose a name, e.g., @SalesBot, and copy the bot token

Configure Telegram Node:

Add Node: From the right-hand menu, click Telegram NodeEnter the bot token and click Test ConnectionConfigure Advanced Settings (Welcome Message, Access, Limits)

Advanced Settings & Final Steps

• Welcome Message: Set a greeting for users• Group Access: Enable if needed for team collaboration• Access Restriction: Select All for public access• Message Limit: Set to, e.g., 10 messages per minute

Step 7: Add the Trigger Node

To automate the initiation of your workflow with precise timing:

Add Node:

From the right-hand menu, click Trigger Node and drag it onto the canvas in the Delaverse Playground.

Configure Node:

Click the node and enter a title.Timing Settings: In the “Timing Settings” section, choose the scheduling type from the dropdown: • Interval: Select a value and unit (e.g., 1 day) for regular execution, and set the timezone (e.g., Asia/Tehran).• Cron Expression: Enter a Cron pattern, e.g., “0 8 * * *” for daily at 8 AM, following the provided example.Message Text: Enter “مطابق دستورالعمل، عمل کن” (Act per instructions) to guide the AI Assistant Node in executing the workflow’s analysis and reporting tasks.Maximum Executions: Leave blank for unlimited runs or enter a number (e.g., 10) to cap executions.Trigger Status: Toggle the status button to “On” to activate the trigger.Status Info: After setup, review execution history (e.g., runs completed) and click “Update Schedule” if timing changes are needed.

Connect Nodes:

• Connect the Trigger Node’s output to the AI Assistant Node’s input to initiate the workflow.

Test the Trigger

• Configure timing and message text, then click “Test Trigger” to simulate a workflow run. Verify outputs appear in Telegram, Google Sheets, or Google Docs, depending on your setup.

Save Changes:

• Click “Save Changes” to apply all configurations, then close the editor with the top-left “X” button to return to the Playground.

Why It’s Needed

• The Trigger Node automates the start of non-API workflows, working with the AI Assistant Node to initiate the workflow.

Key Tips for Success

Training Content: Use real data (e.g., CSV customer lists, brand tone guidelines)
Data Source Selection: Choose either Google Sheets or API to reduce complexity
Persian Language: Keep all settings and outputs in Persian
Testing: Verify generated SMS and email content
Continuous Saving: Click Save Changes after every modification

Final Output

Customer data is collected from File Database, Google Docs, Google Sheets, or API
Personalized SMS and email messages are generated based on brand tone and marketing goals
Outputs are structured as JSON, ready for delivery
Comprehensive marketing automation system with personalized messaging capabilities
General Note on Workflow Customization
This workflow, like all workflows in Delaverse’s knowledge base, is designed as a sample for educational purposes. Users can extensively customize nodes, settings, and input files to meet personal or organizational needs. For assistance, consult our 24/7 support chatbot or submit a ticket for guidance. If you’re unable to build or modify the workflow yourself, request professional workflow creation via a ticket; we’ll provide a cost invoice based on your subscription level, and after payment, we’ll collaborate to build it. For new node development (e.g., a custom node not yet available), submit a ticket with your requirements, noting that such requests may incur higher costs due to development efforts. Our team is here to ensure your automation success! 😊

Ready to Transform Your Marketing Automation?

Start building your intelligent SMS and email marketing workflow today. Generate personalized messages, boost customer engagement, and drive conversions with AI-powered automation that adapts to your brand tone and marketing objectives.